Installing VS Code on a Chromebook
Like Visual Studio Code? Got a Chromebook capable of running Linux Apps? Here’s how to combine the two to get the best of both.
TL;DR: Just 5 Steps for the Impatient
If you don’t fancy a step-by-step guide or a gallery of pretty screenshots, then the following basic instructions — which are correct for a cheap and cheerful Acer Chromebook as of 2020-10-13 — should suffice:
- Upgrade your Chromebook to the latest Chrome OS version
- Enable Linux Apps (Beta)
- Download the latest Debian VS Code package from the official release page
-
Install the VS Code package by right-clicking on the downloaded
.debfile in the Chrome OS Files app and selecting “Install with Linux (Beta)” - Enjoy VS Code on your Chromebook!
Happy? Got what you were looking for in the time you were willing to invest? Fantastic! Now, join the rest of us for how we got there in the first place (and elaborate security considerations as well as admire some beautiful screenshots along the way)…

Productivity, Convenience, …
When it comes to productivity, convenience really is king for me! Over the past decades I’ve used numerous IDEs, tending to stick with what Worx for Me!™, until either my requirements could no longer be met or something better came along that evolved my workflow altogether.
When I first encountered Visual Studio Code (in short: VS Code), I was initially quite sceptical about yet another fully-customisable editor built in yet another language that had seen a massive spike in popularity over recent years.
But I was also quickly and gladly proven wrong by its value proposition. Over the past years, I’ve found myself slowly transitioning VS Code right into the centre of my productivity toolbox. By now, it’s thoroughly in the middle.
It’s simple. It’s (fairly) lightweight. It’s “batteries included” which means that it’s got most of the things I need right out of the box. And it’s got a million and one extensions for just about everything I need (or have not yet realised that I need them).
VS Code has become the de-facto editor of choice for me — for everything from open source development to writing blog posts in Markdown (yep, also this one).
When it comes to blogging (you’re looking at it), VS Code has supported me in evolving my workflow into a GitOps centric one where I can effectively and efficiently author “articles-as-code” using post2ghost. In short, it Worx for Me!™

…and Chrome OS
So, when finally getting my hands on a cheap and cheerful Acer Chromebook with a full-size and comfortable keyboard, it sounded like the perfect blogging machine. It’s portable. It’s lightweight. And it’s got great battery life for something that has the weight of two tea bags and looks like it did shrink in the wash.
There was only one tiny problem. It didn’t have VS Code on it. Not out of the box. Not in the Chrome Web Store. And not in the Google Play Store either (side note: having Android apps running on Chrome OS is a really differentiating feature and opens the door widely into that giant universe).
It’s not that I was reluctant (some would say stubborn) to consider the switch to another editor. I did try a couple. And miserably failed after about an hour in.
They didn’t have what I needed. They were made for a slightly different purpose. They didn’t integrate with the ecosystem I came to rely upon. But most importantly, they didn’t provide the necessary tools to integrate with my existing workflow. Not good. Because
Regardless of the platform: I need the right tools, to get the job done!
So, the job at hand was fairly straightforward
How to install VS Code on a cheap and cheerful Acer Chromebook?!

The General Options for Linux Apps
At this point, it helps to know that Chromebooks run Chrome OS as their operating system. And with Chrome OS effectively being Linux under the bonnet with a shiny UI on top, the choices are actually plentiful when it comes to running Linux Apps, such as VS Code, on a Chromebook.
The list of general options ranges from
- Parting with Chrome OS entirely and installing another Linux distribution (such as Ubuntu) on the Chromebook, effectively only leveraging the hardware
- Enabling the root user in Chrome OS for unrestricted access
- Enabling developer mode in Chrome OS for local user level access
- Leveraging Android apps such as Termux for local user level access in a terminal emulator and Linux environment app
- Enabling the recently released Linux Apps (Beta) feature
Now, not all of the above options offer a parity experience when it comes to installing and subsequently working with Linux Apps. Some of them, especially the ones that forgo the Chrome OS ecosystem entirely or enable special users or modes offer greater flexibility. However
“With great power comes great responsibility.” — Spider-Man
And in the context of a Chromebook, this means that the newly gained flexibility can come at a steep price: a drastic impact on security when not properly attended to.
Inspired by a post about a USD 169 Developer Chromebook that discussed the security implications of several options in detail, the big security principles for the VS Code installation on my Chromebook became quite clear
- Chrome OS would remain as the single operating system of the Chromebook
- Privileged access would remain disabled
- No special modes or native tooling would be enabled that could potentially weaken the security posture of the Chromebook
- The VS Code installation would have to leverage native Chrome OS features without installing another Linux OS on the side, as
- Space is already scarce on the Chromebook and
- Any additional Linux installation would most likely
- Bring its own ecosystem
- Effectively require constant manual maintenance as support for it many not be natively integrated into Chrome OS
- Have an impact on battery life as it cannot leverage native OS support for resource intense applications like X-Server
- Stay within the current manufacturer supported bounds of Chrome OS
The above security principles effectively leave option 5 from the list of options at the start of this section as the only viable option. And that’s not necessarily a bad choice. All other options are basically side-stepping the manufacturer’s support and hence can make a Chromebook less secure.
Let’s be absolutely clear about this: All of the above options make a Chromebook less secure (but so does you connecting it to the internet in the first place). So, the real question becomes
How and when would you like your Chromebook to be hacked?!
It’s just that option 5 seems to be able to prolong the inevitable long enough to strike a decent balance between usability and security.

A Step-by-Step Guide
During the process of installing VS Code on my Chromebook, I found myself looking up several things while working through the problems encountered en route.
In the spirit of modern systems and software architecture, the below is merely the result of carefully sellotaping together readily available components I leveraged on the end-to-end journey to eventually achieve my goal.
As well as a screenshot-bonanza, I have to admit. But then they are so descriptive. Let alone beautiful.
A Fresh Start
The first useful step for every installation journey is to depart from a know location. Hence, I decided to start from a fresh installation of Chrome OS as I didn’t fancy any leftovers from previous (read: failed) experiments (I have to admit that I did try options 2,3, and 4 from the above list before eventually settling for option 5).
The factory reset process is fairly straightforward and well documented (as a lot of things around Chromebooks actually are — thanks, Google!). Once complete, the factory reset Chromebook did eventually greet me with the below screen.

Upgrading Chrome OS
One of the great features of Chromebooks is that they come with automatic and free upgrades for years to come. Running the latest and greatest Chrome OS version not only remediates know security vulnerabilities but also enables new features such as Linux Apps (Beta). And we want both!
Once again, the upgrade process is fairly straightforward and well documented. In short, the process for me was
- Clicking on the time in the bottom right corner opened a panel with several options
- In the panel that opened, selecting the cog symbol opened up the Chromebook’s settings menu in a separate window
- In the Chromebook’s settings menu, choosing the “About Chrome OS” option on the left hand side eventually displayed the below screen
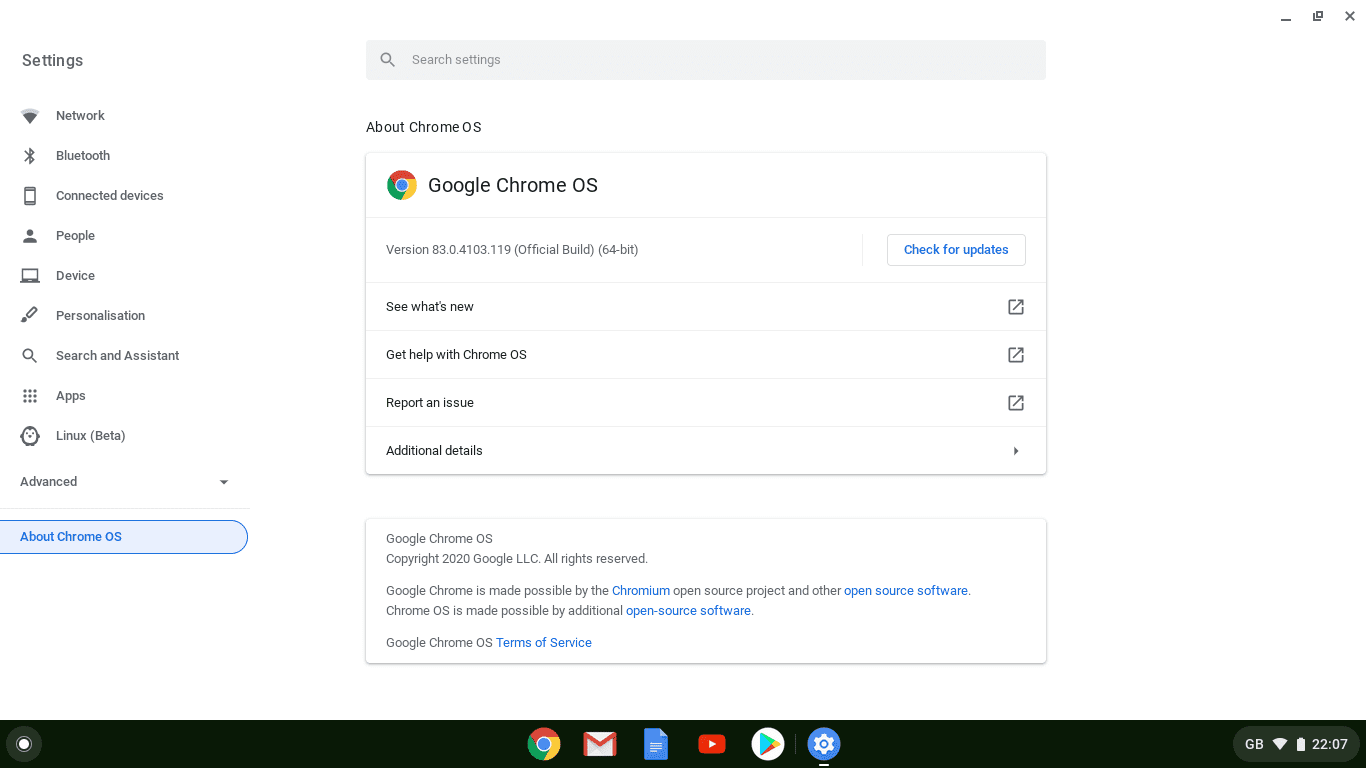
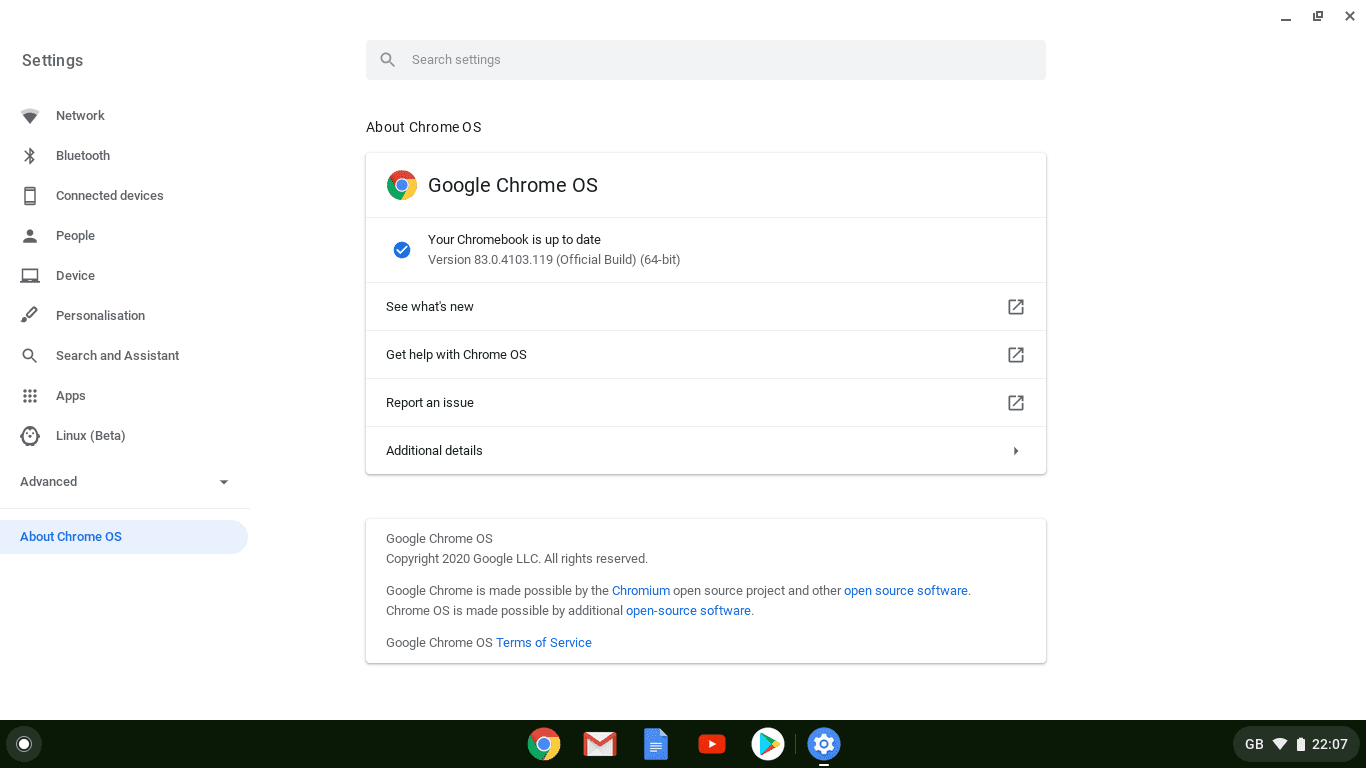
- Clicking on the “Check for Update” button did (and still does) what it says on the tin; if there’s an update available, then the button subsequently allows me to install the new Chrome OS version. As I was already running the latest version of Chrome OS at the time of writing, I received the below screen
Enabling Linux Apps (Beta)
With the latest Chrome OS version installed, it was time to enable Linux Apps (Beta). As you would expect by now, this is again fairly straightforward and well documented. The process for me was (skip ahead to step 3 if you still have the Chromebook’s settings menu open)
- Clicking on the time in the bottom right corner opened a panel with several options
- In the panel that opened, selecting the cog symbol opened up the Chromebook’s settings menu in a separate window
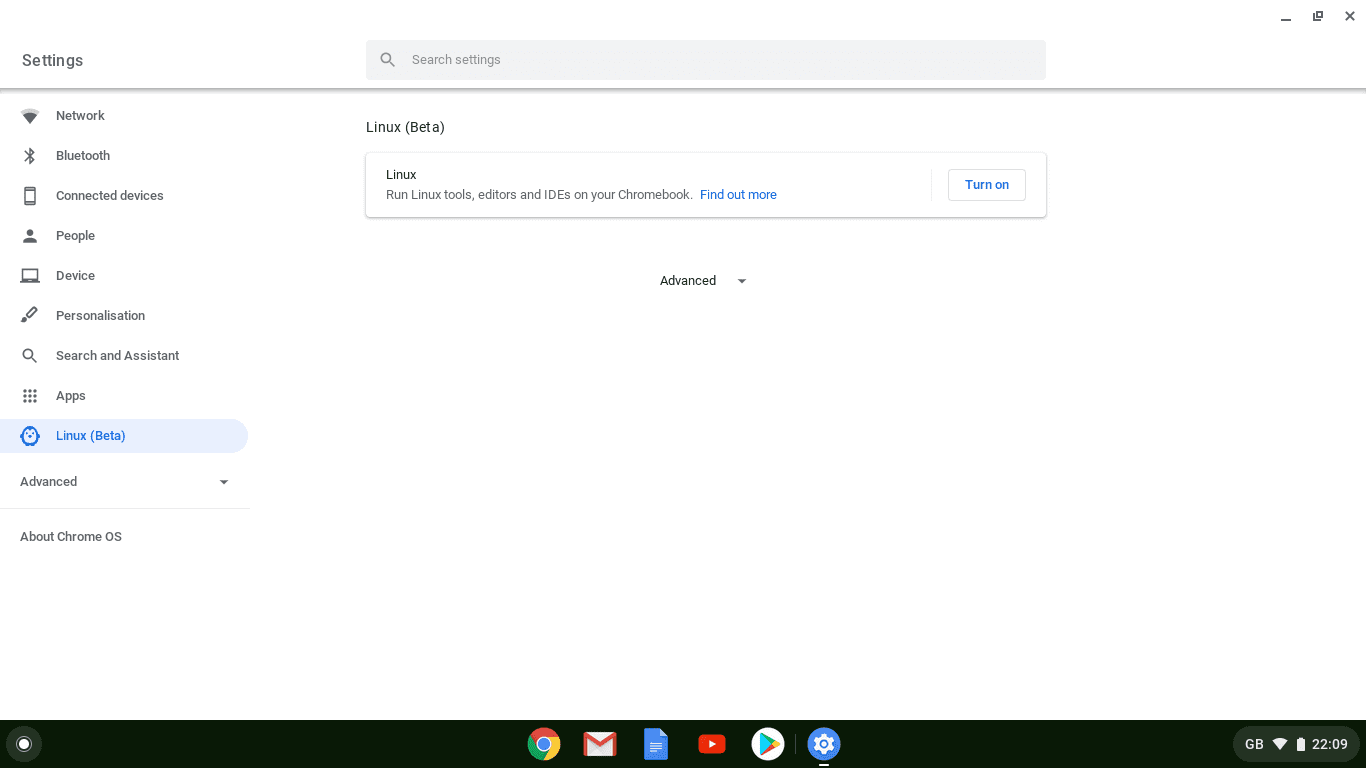
- In the Chromebook’s settings menu, choosing the “Linux (Beta)” option displayed the below screen
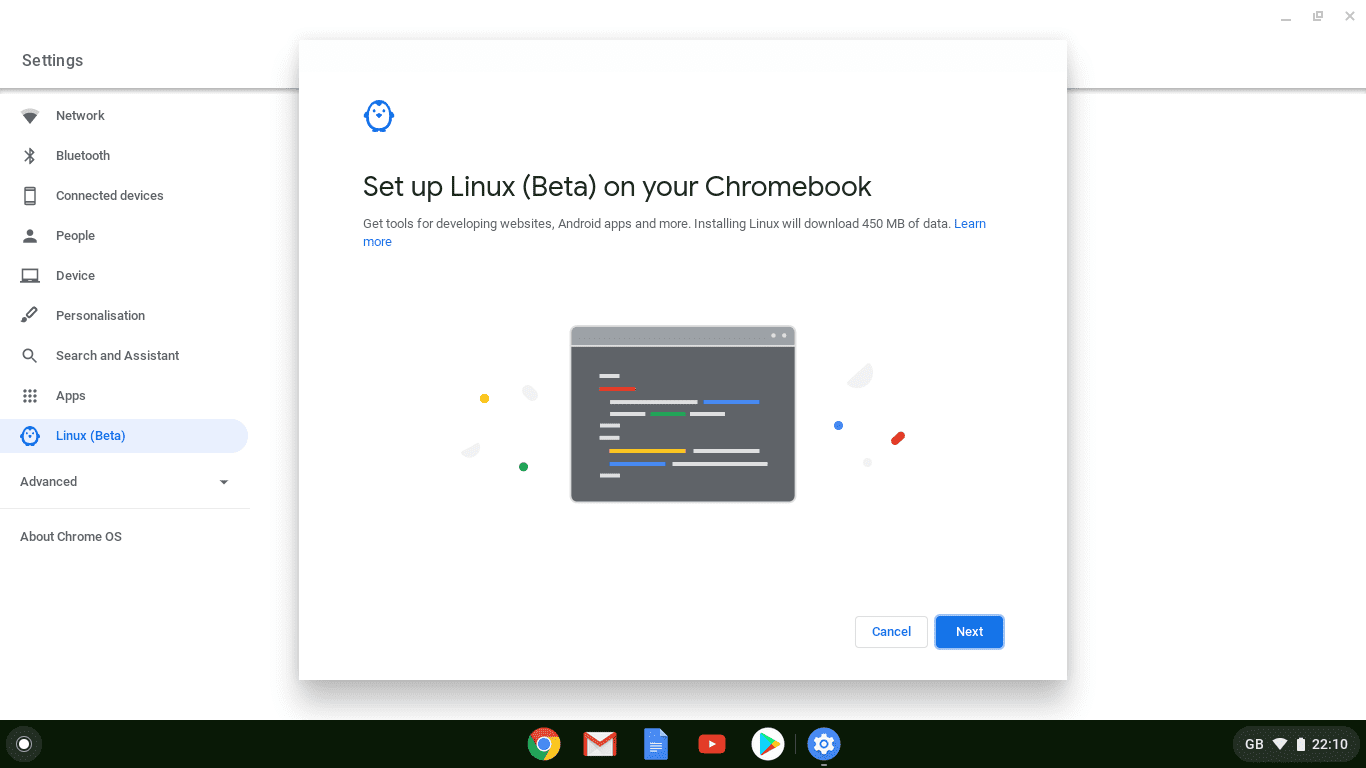
- Clicking the “Turn on” button then displayed the below screen
- Clicking on “Next” displayed the below screen where I changed the default username from
dominicdumrauftodominicfor sake of simplicity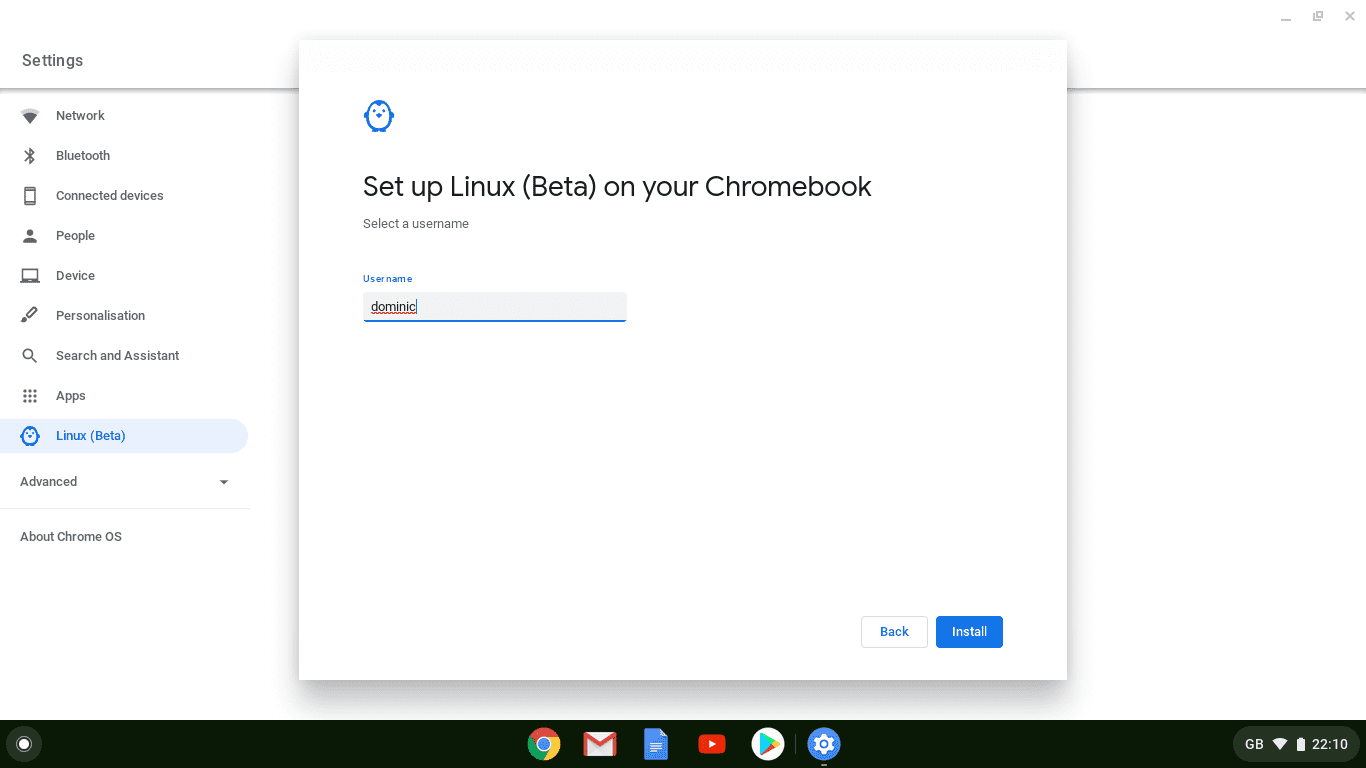
- Clicking on “Install” then displayed the below screen
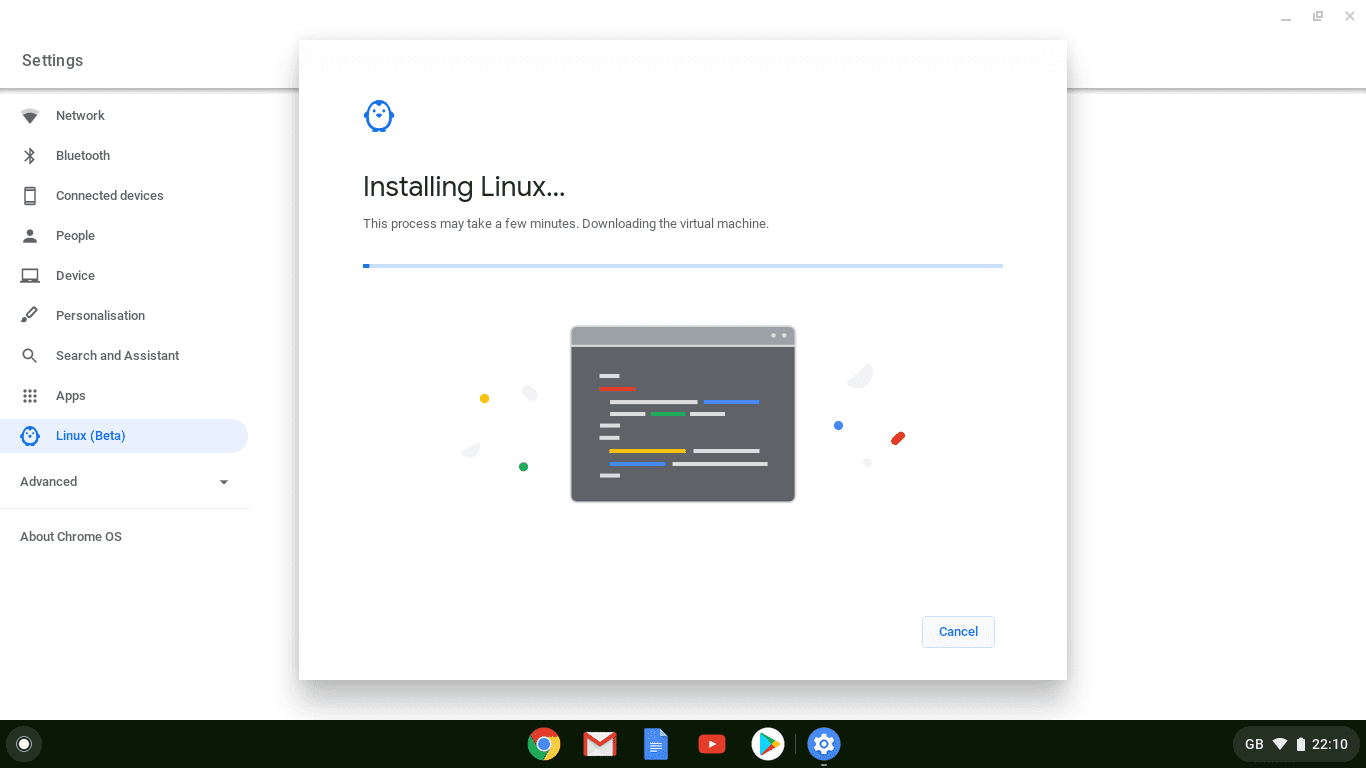 At this point, it was time to grab a cuppa, while Chrome OS (as of 2020-07-12) was going to
- download the virtual machine
- start the virtual machine
- start the Linux container
- set up the Linux container
- start the Linux container (again)
- At the end of the installation process, I was eventually greeted with a new blank window (remember, my Acer Chromebook is cheap and cheerful) as per below
 Depending on the speed of your machine, this step might hardly be noticeable for you.
 - In my case, the blank screen was thankfully short lived while the new Terminal application was opening up with the resulting below screen

Pinning Terminal to Shelf (Optional)
The Terminal application was automatically launched at that point in time, but re-launching it required digging through some menus. While pinning the Terminal application to the shelf (what’s also known as Dock on macOS) is entirely optional, it does make later access a lot easier.
The process for me was
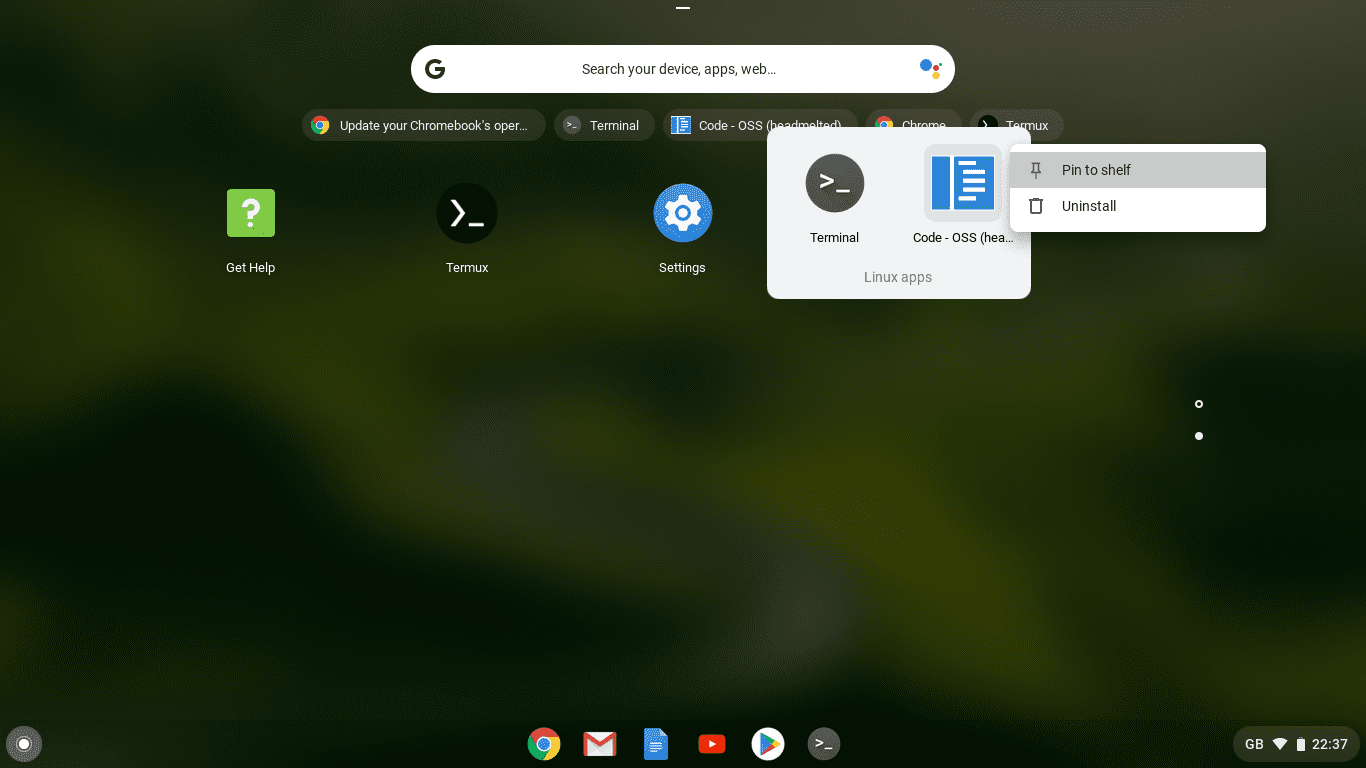
- Clicking on the circle icon (also referred to as “Launcher”) in the bottom left corner and extending it all the way, by clicking on the topmost chevron symbol (“^”), opened up a panel with the installed applications
- Scrolling down to the “Linux apps” and clicking on the collection opened up an overlay with the Terminal application in it
- Right clicking on the Terminal application opened up another menu as per below
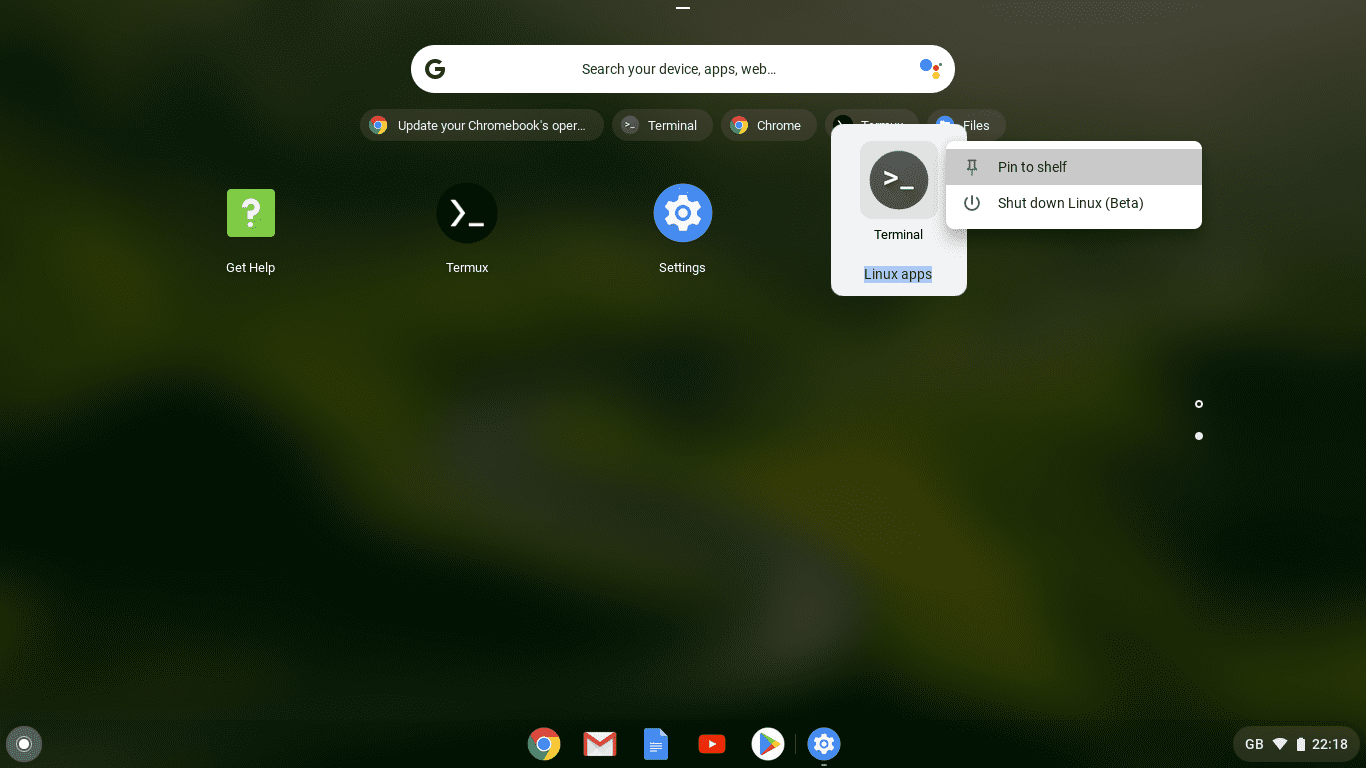
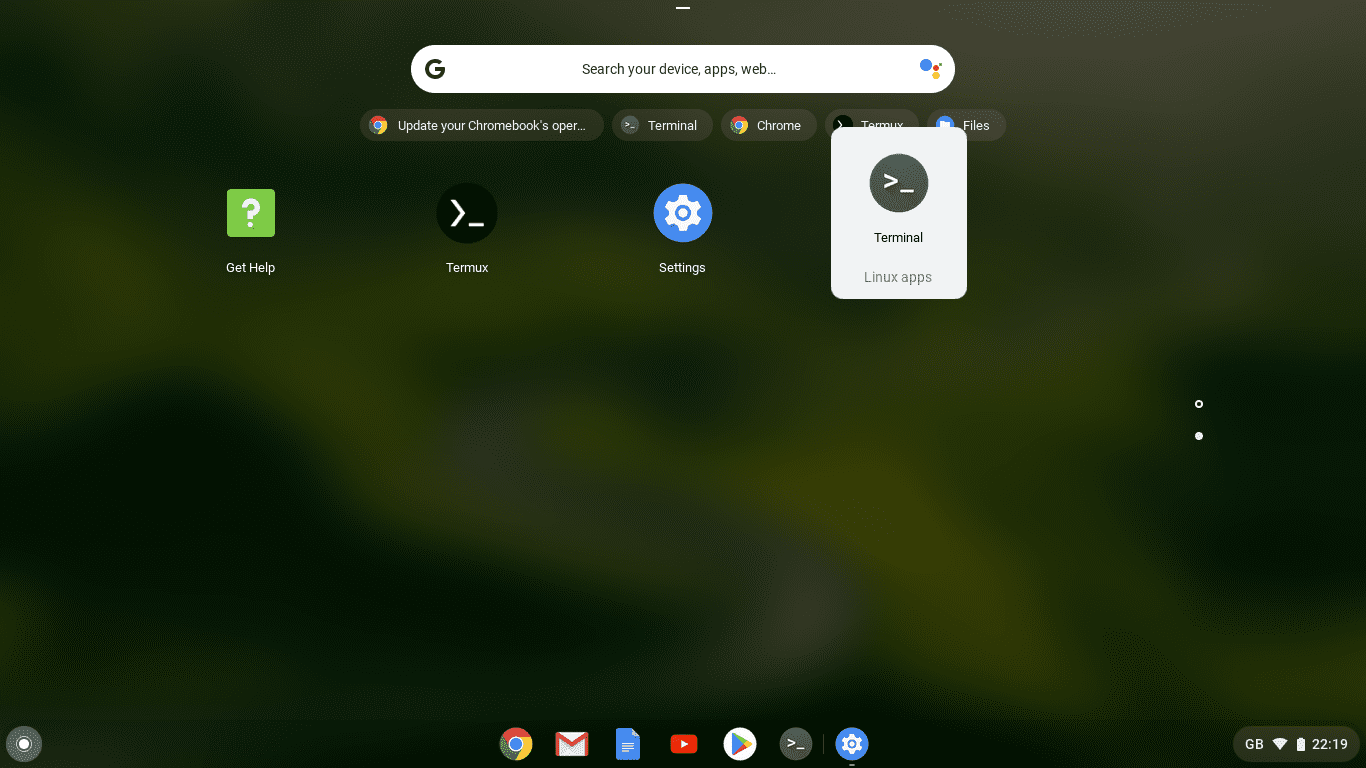
- Clicking on “Pin to shelf” closed the second menu and pinned the Terminal application to the shelf as per below
Downloading the Right VS Code Package
With Linux Apps (Beta) installed and the Terminal application pinned to the shelf for easier access, it was time to start with the actual VS Code installation.
Here, the only tricky bit is to know which Linux distribution to download from the official VS Code release page. While the method of looking up the distribution name seems to differ between Linux distributions, executing
$ cat /etc/os-release
PRETTY_NAME="Debian GNU/Linux 10 (buster)"
NAME="Debian GNU/Linux"
VERSION_ID="10"
VERSION="10 (buster)"
VERSION_CODENAME=buster
ID=debian
HOME_URL="https://www.debian.org/"
SUPPORT_URL="https://www.debian.org/support"
BUG_REPORT_URL="https://bugs.debian.org/"
in the Terminal application did eventually reveal that it was in fact a fairly recent Debian Buster installation.
With the Linux distribution name at hand, the process for me was
- Opening Chrome (or any other browser) and surfing to the official VS Code download page
- Clicking on the box with label “
.debDebian, Ubuntu” as in below screen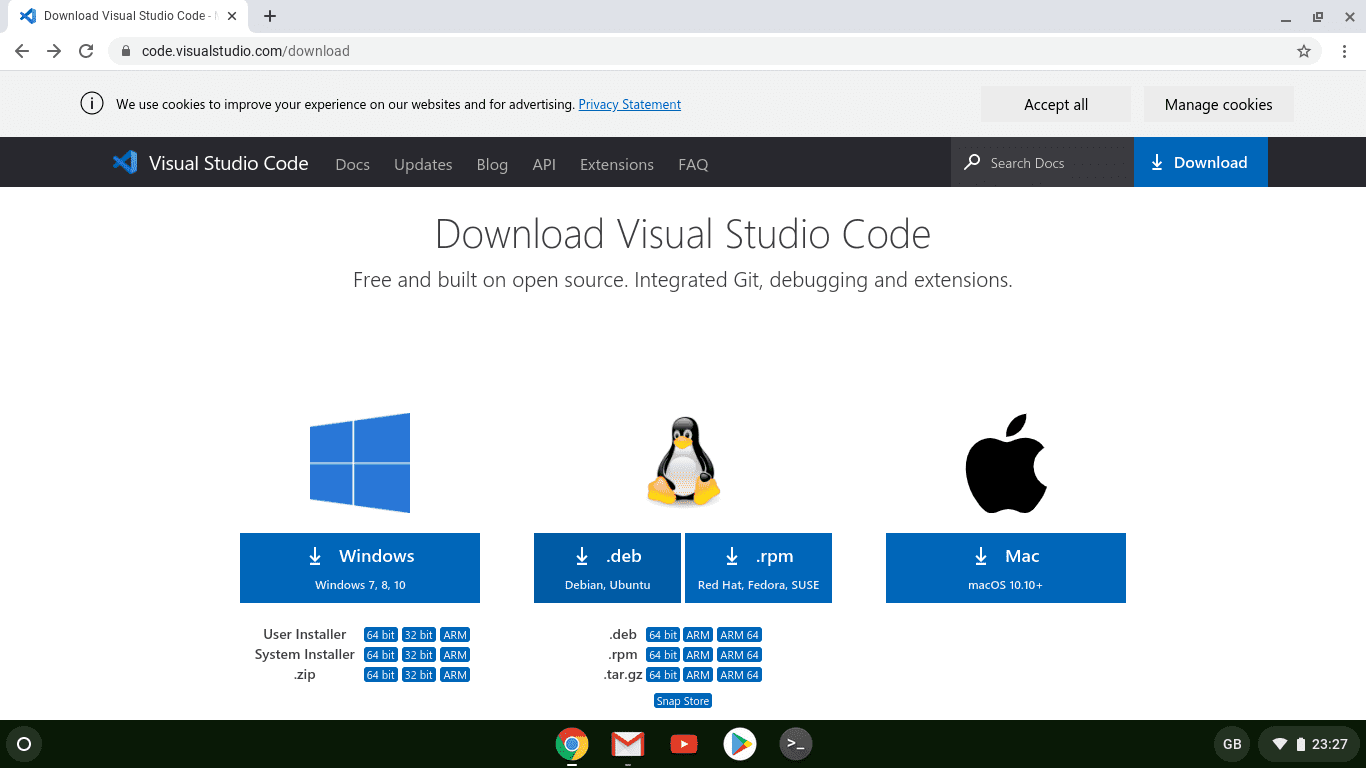
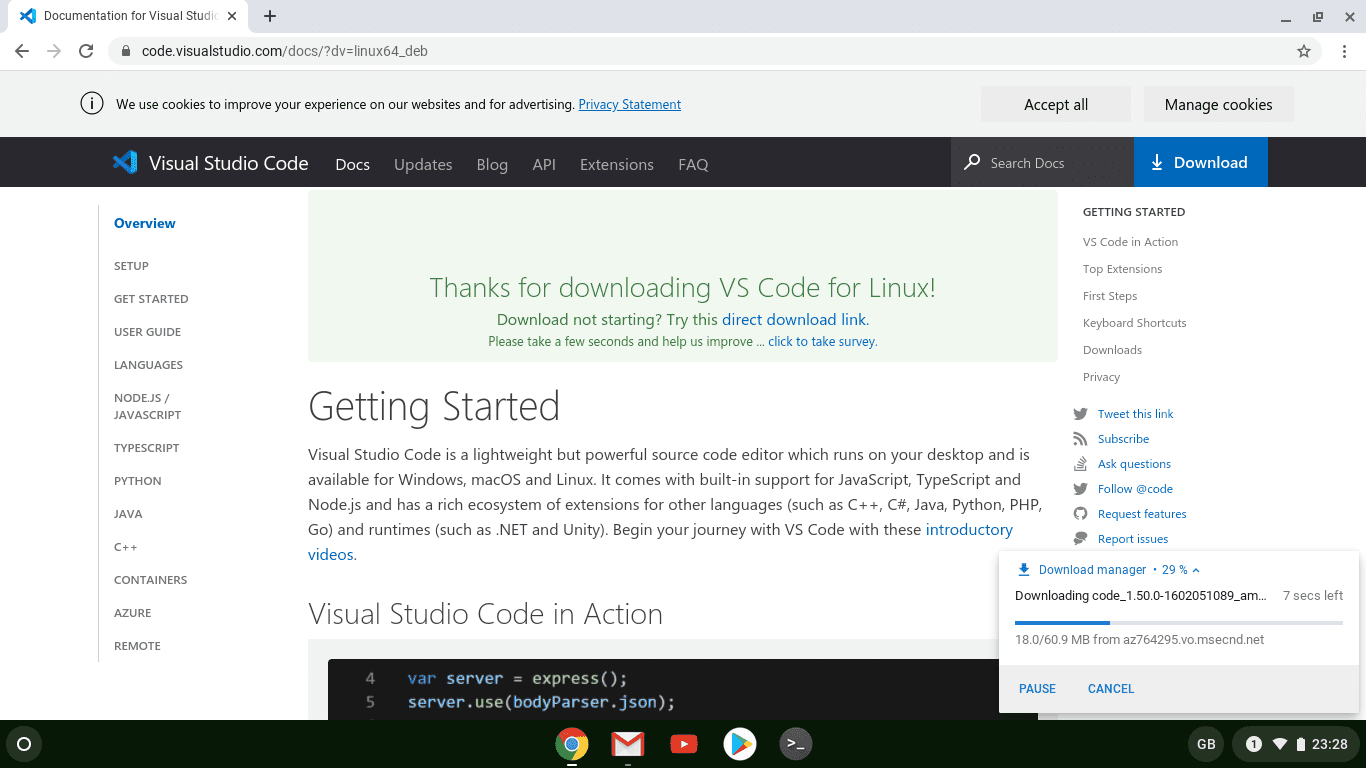
- On the page that opened up, waiting for the automatic download to finish as in below screen
Installing the VS Code Package
With the correct VS Code package downloaded, it was time to finally install it. This boiled down to opening the Chrome OS Files app and installing the package via the right-click menu item “Install with Linux (Beta)”.
The process for me was
- Clicking on the Launcher icon in the bottom left corner opened up a panel
- Typing in “Files” revealed the Chrome OS Files app as in below screen
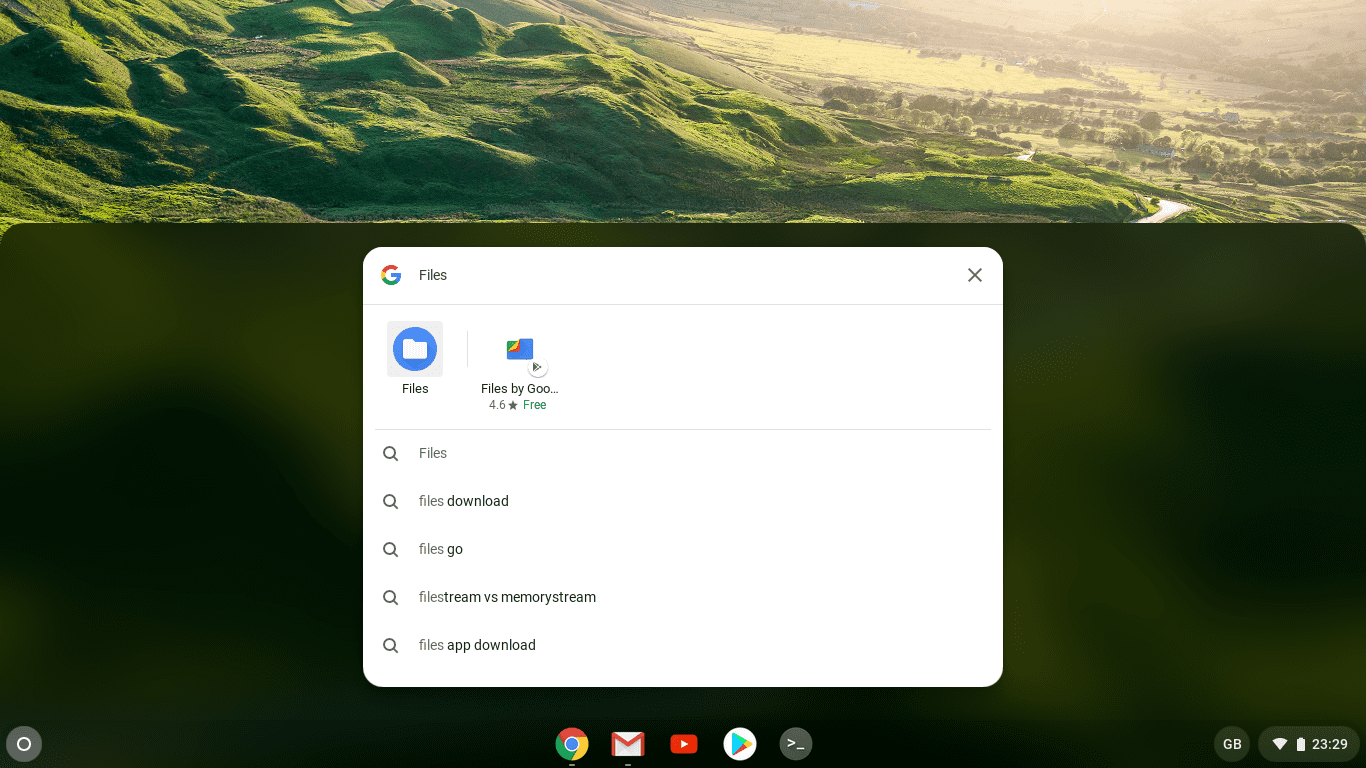
- Clicking on the “Files” app launched it
- In the “Files” app, clicking on the “Downloads” folder displayed its contents
- Right-clicking on the
.debpackage downloaded in the previous section opened up the file-specific menu as in below screen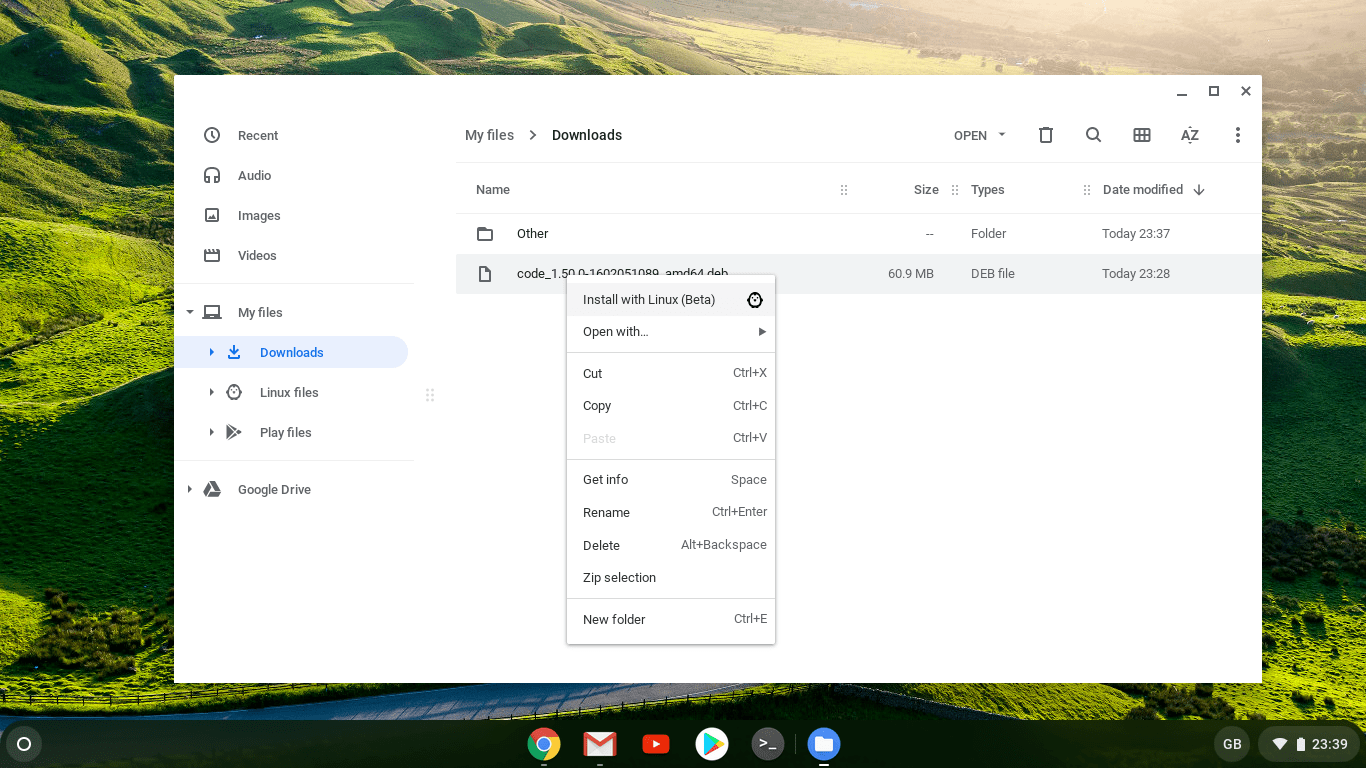
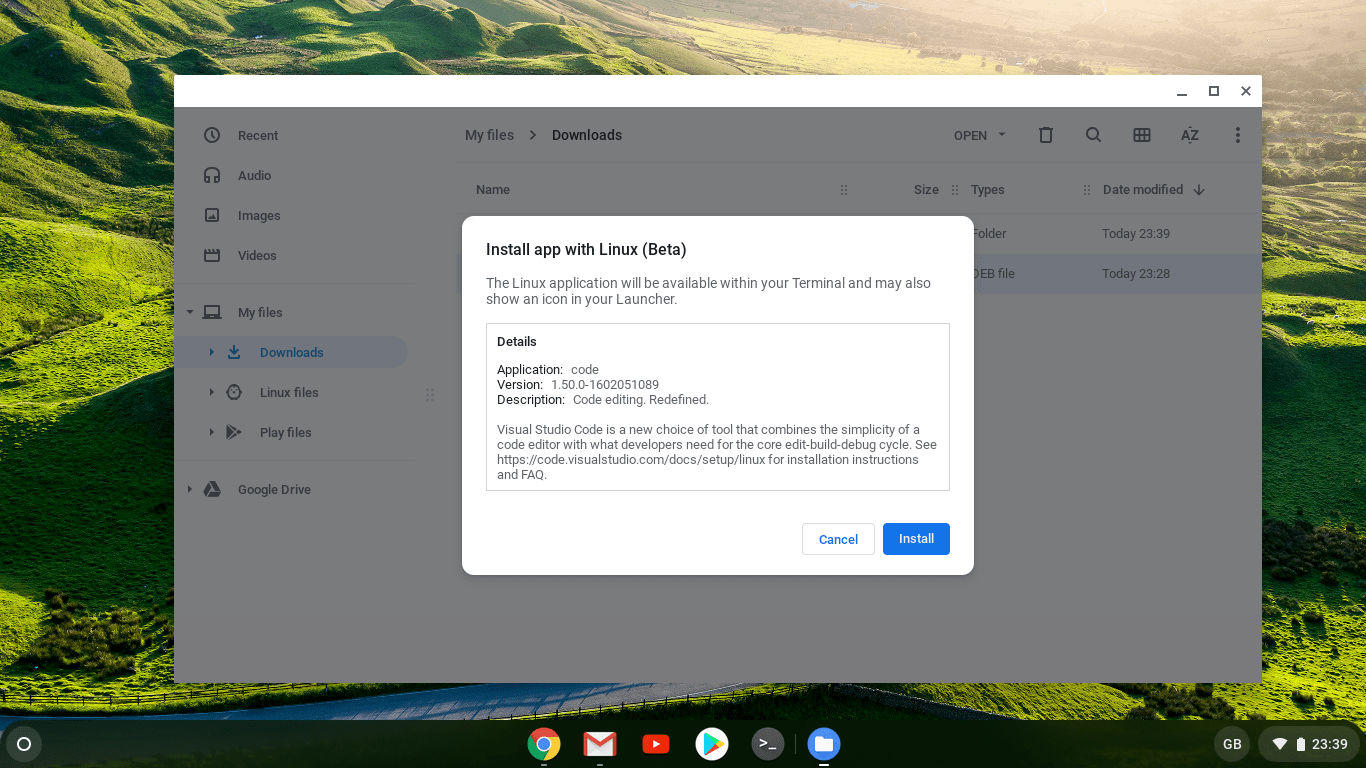
- Clicking on “Install with Linux (Beta)” brought up the “Install app with Linux (Beta)” dialogue as in below screen
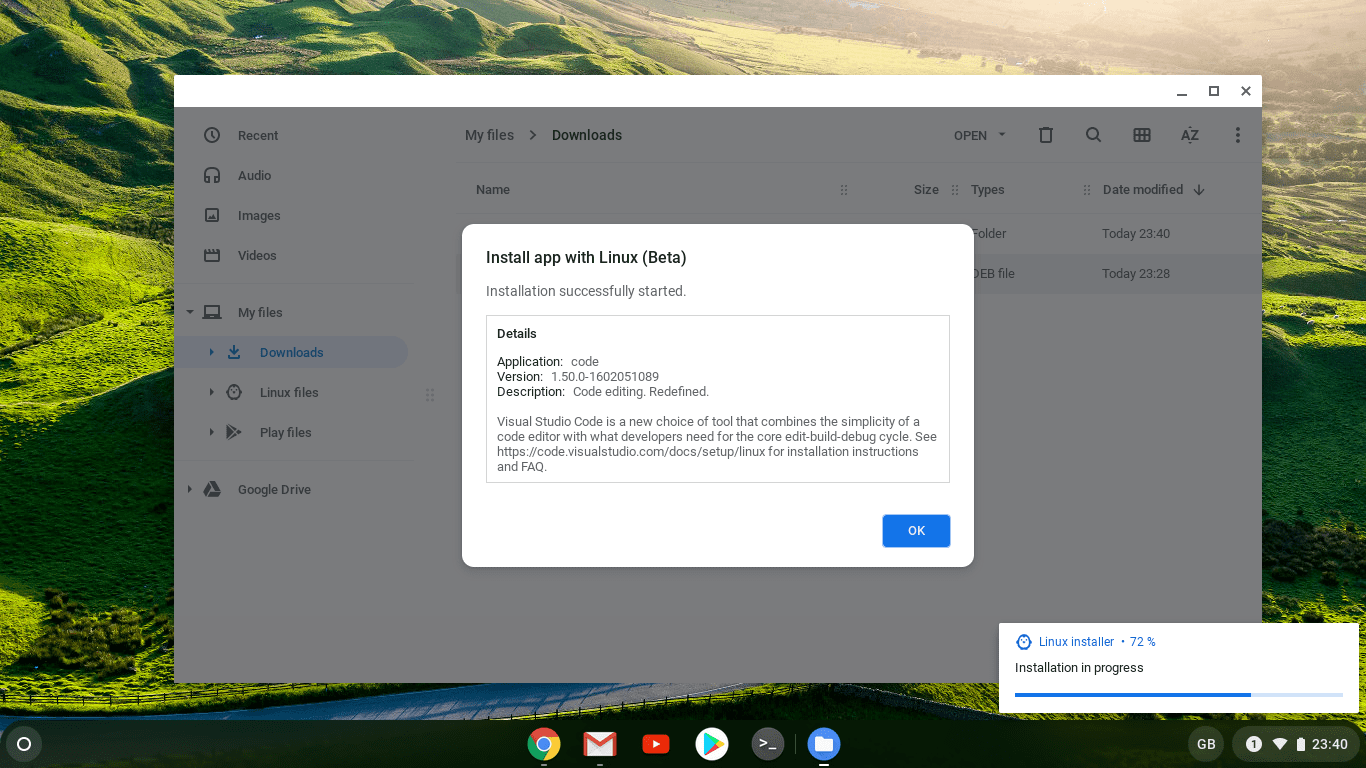
- Clicking on “Install” started the installation with the Linux installer reporting progress as in below screen
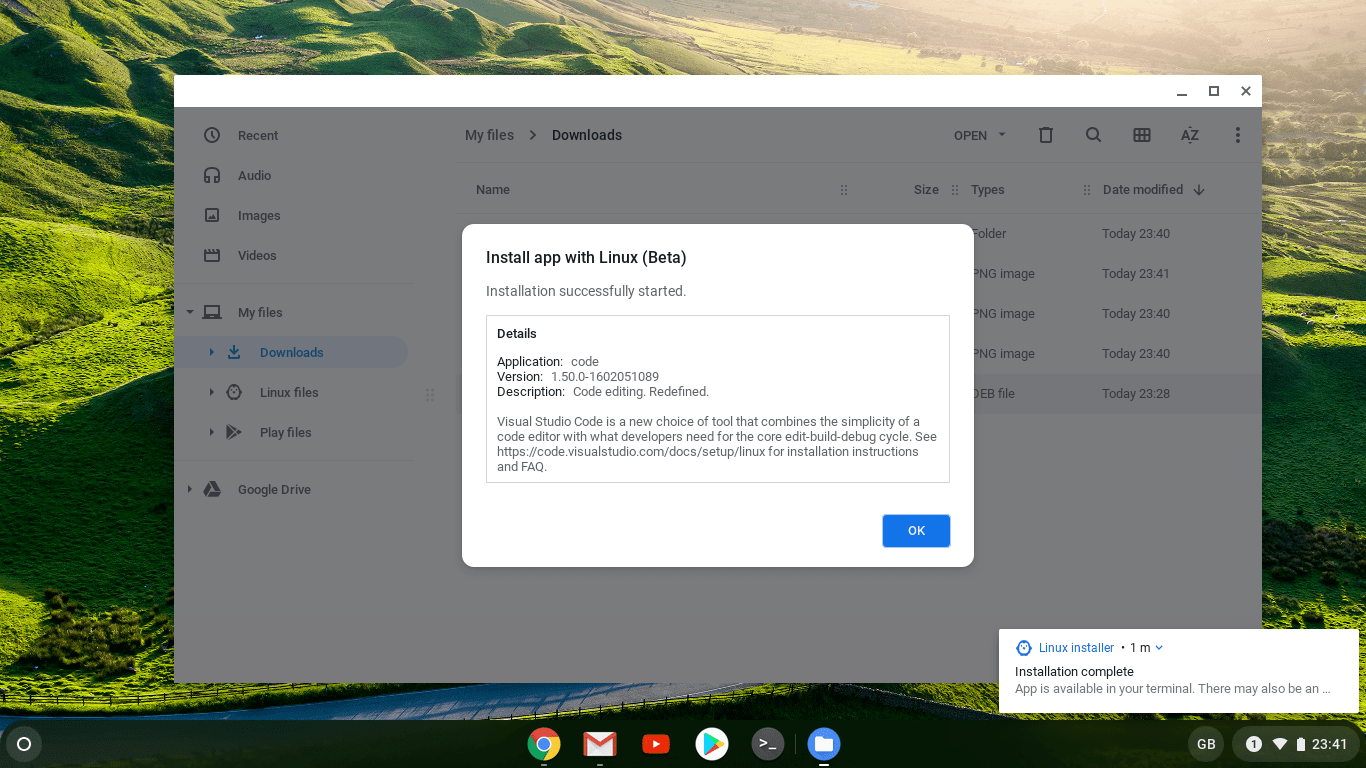
- Waiting until the Linux installer eventually reported success as in below screen
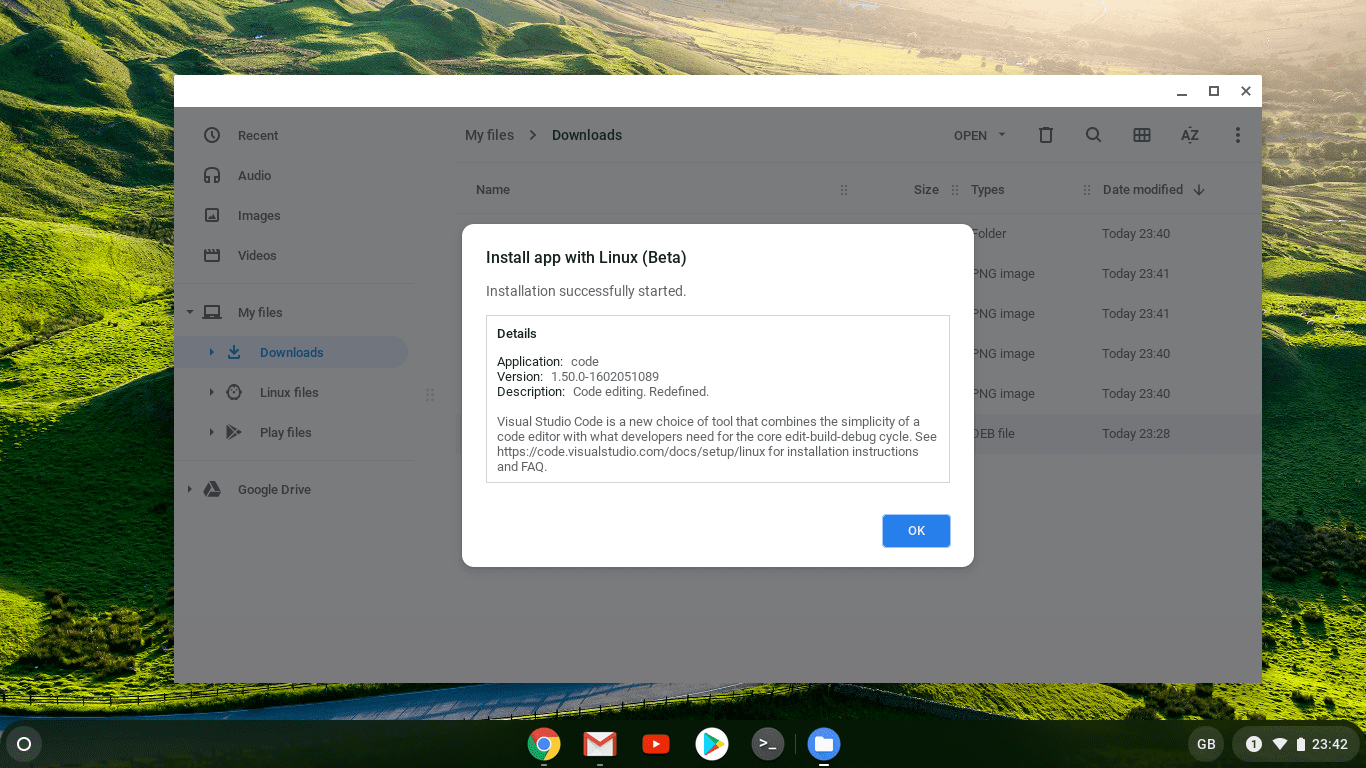
- Clicking “OK” on the remaining “Install app with Linux (Beta)” dialogue as in below screen
 closed it
 - (Optional cleanup) Right-clicking on the
.debpackage opened up the file-specific menu again as in below screen
- (Optional cleanup) Clicking on “Delete” removed the item from the “Downloads” folder
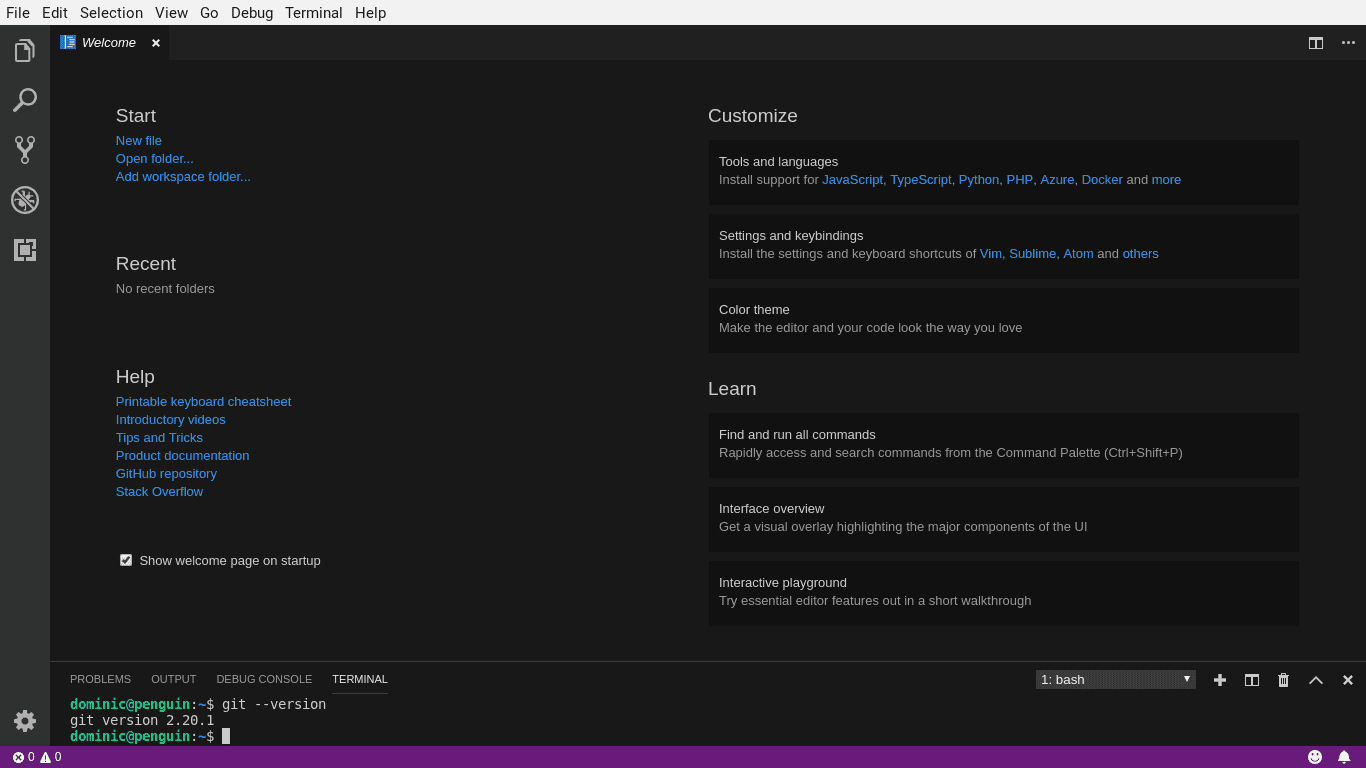
Launching VS Code
Once the above steps had successfully completed, VS Code was finally installed on my Chromebook. Now, there are several methods of actually launching it.
Regardless of the option, bare in mind that VS Code is running in the Linux Apps (Beta) VM which may need to be started first and could hence slightly delay things.
From the Terminal Application
VS Code can be launched from the Terminal via
code
and will eventually open in its separate window.
From the Shelf
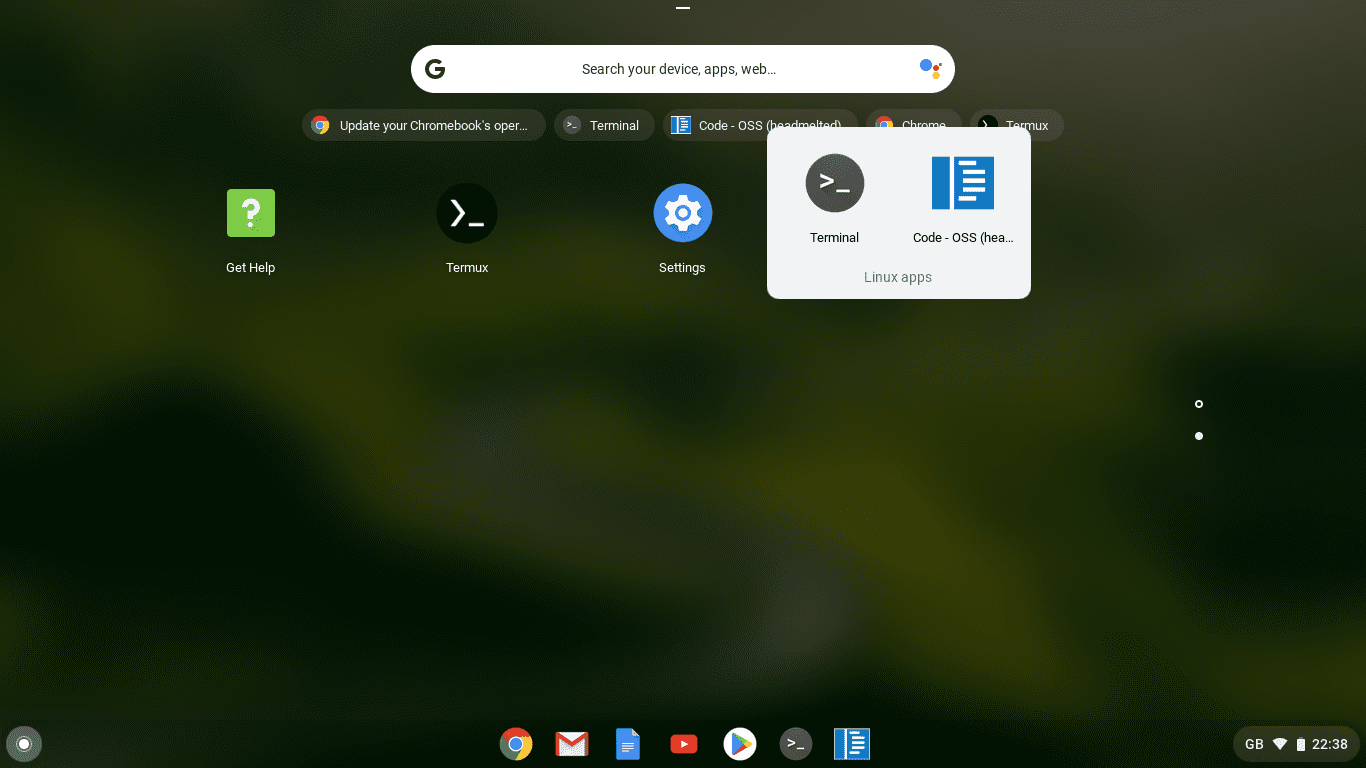
An easier way of launching VS Code is from the shelf. Similar to pinning the Terminal application to the shelf, the process for me was
- Clicking on the Launcher icon in the bottom left corner and extending it all the way, by clicking on the topmost chevron symbol (“^”), opened up a panel with the installed applications
- Scrolling down to the “Linux apps” and clicking on the collection opened up an overlay with the Terminal application and VS Code application in it
- Right clicking on the VS Code application opened up another menu as per below
- Clicking on “Pin to shelf” closed the second menu and pinned the VS Code application to the shelf as per below
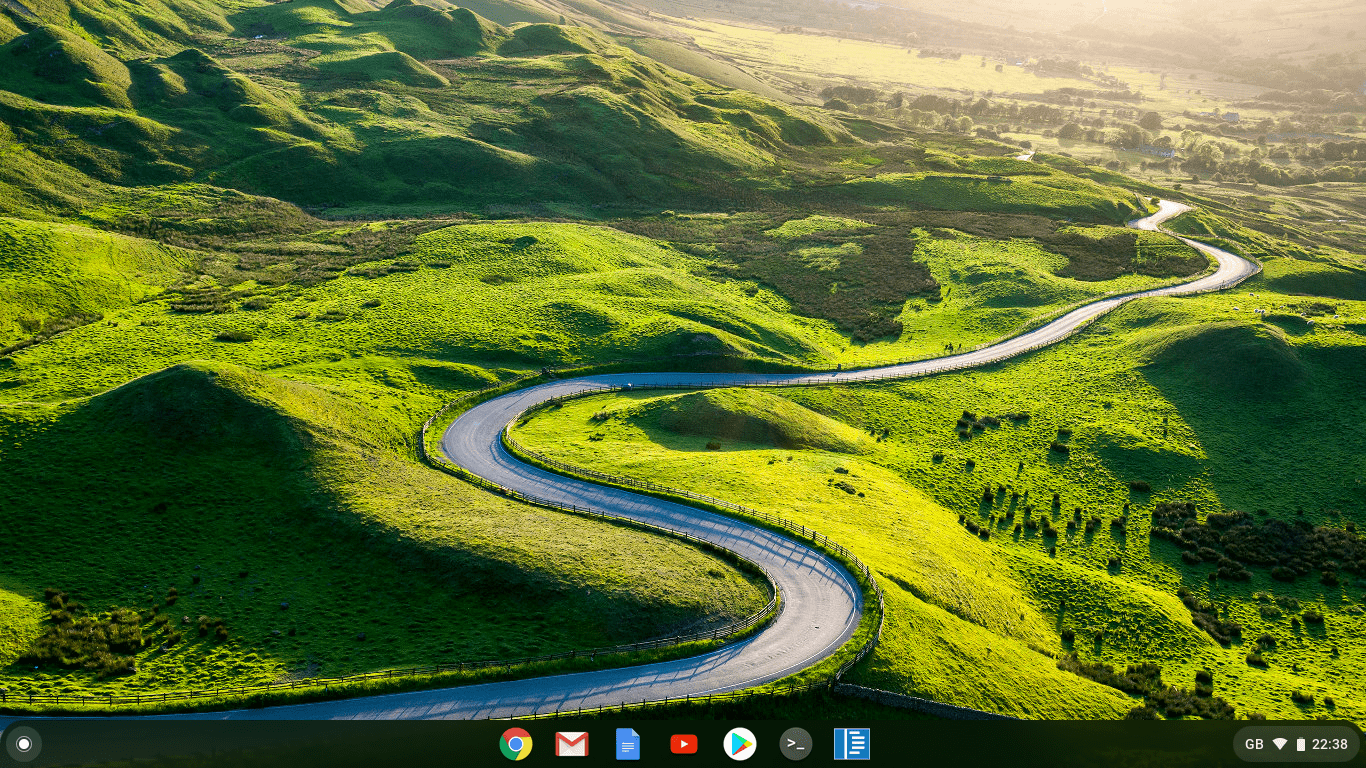
The End Result
Regardless of launching VS Code via the Terminal or via the shelf, the end result for me is my currently favourite editor on a cheap and cheerful Acer Chromebook. Plus all the right tools to get the job done!
And best of all, VS Code also has full screen integration which makes it great for distraction free writing as per below screen
At the end, the shiny home screen of my Chromebook now has a full Terminal application. And there’s VS Code. Ready to get cracking.
Well, after transferring all necessary secrets and settings to the Chromebook over HTTP using nothing more than on-board tools from both my Mac and my Chromebook. A sort of poor man’s HTTPS, when there’s no real HTTPS available.
Time will tell if my cheap and cheerful Acer Chromebook turns out to be the blogging machine I hoped it would be. But at least now, it would not have been the tools standing in the way of its success.

So, How do You Install VS Code?!
While the above Worx for Me!™ when it comes to installing VS Code on a cheap and cheerful Acer Chromebook, you may have an alternative or better way.
Think this is all rubbish, massively overrated, or heading into the absolutely wrong direction in general?! Feel free to reach out to me on LinkedIn and teach me something new!
As always, prove me wrong and I’ll buy you a pint!
Subscribe to How Hard Can It Be?!
Get the latest posts by following us on LinkedIn and Twitter
